
You’ve decided you really want a blog! Awesome! There are so many things and questions to answer before it becomes alive. But don’t worry, this series of posts will walk you through all the steps necessary to get you up and running on the web.
Table of Contents
The Approach at a high level
New blogs need to build an audience to increase traffic and start making some income. However, in the beginning, traffic may not be high enough even to pay for hosting. So, how do we run a blog almost for FREE, but still maintain high standards? Well, most cloud providers at the time of writing have “one year free” offers. The catch is that “free tiers” do not cover large machines or scaling possibilities; however, for a “just starting blog,” these limitations are acceptable.
How about security? How can we have HTTPS for our blog? The answer is a free TLS certificate issued by Let’s Encrypt. We need that too.
Maintenance? Yeah… No one likes it, so let’s design an infrastructure which requires little to no maintenance and can completely run on autopilot.
Another goal is to stay as independent from a cloud provider’s infrastructure as we can. This allows us to avoid “vendor lock” and easily migrate our blog to a different cloud provider at any time.
We are also going to use WordPress as our content management system and HAProxy as an HTTPS “enforcer”. We are going to run the entire infrastructure in Docker to make setup and testing easy.
Diagram below illustrates our approach. We are going to have four containers.
- WordPress itself
- MySQL database for WordPress
- HAProxy to enforce HTTPS and possibly load-balance in the future
- Certbot to auto-renew our TLS certificate
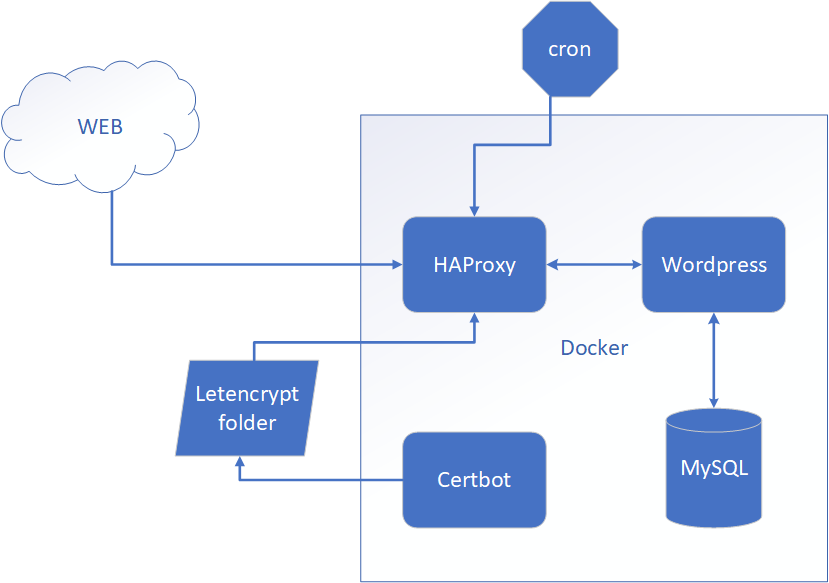
We will mount the certificate folder to the Certbot and HAProxy containers. Certbot will write to the folder when the certificate gets renewed, and HAProxy will read the certificate from the folder.
We also have cron to restart HAProxy container daily. HAProxy needs to be restarted to pick up new certificates when Certbot renews them. The certificates will be renewed at least a week before expiration, so daily restarts of HAProxy will ensure that it always has a valid certificate.
The first thing to owning a blog
First thing first, you need to choose the name. The name of your blog will drive the rest. There are so many options, but here are some ideas.
- You have a great blog name already… That is your name. The blog can be just named as FirstName.LastName or any other combination.
- Choose a positive, cheerful name related to your domain. It can also be combined nicely with a top-level domain, for example, SimplyCodeAs.xyz.
Choose a domain name
After you’ve decided upon a blog name, it’s time to select a domain name. If you’ve already chosen a cloud provider (AWS (Route 53), Azure, Google Cloud, etc.), you can use their domain registration services to check if the domain is available. It would also be easier on you if you use their services because after registering, a cloud provider will do the following.
- Pre-setup routing.
- Bill you for domain registration, so instead of receiving many bills, you’ll have just one.
- Offer or set up domain registration auto-renew, so you don’t need to worry about registration being expired.
Example below shows AWS domain registration page.
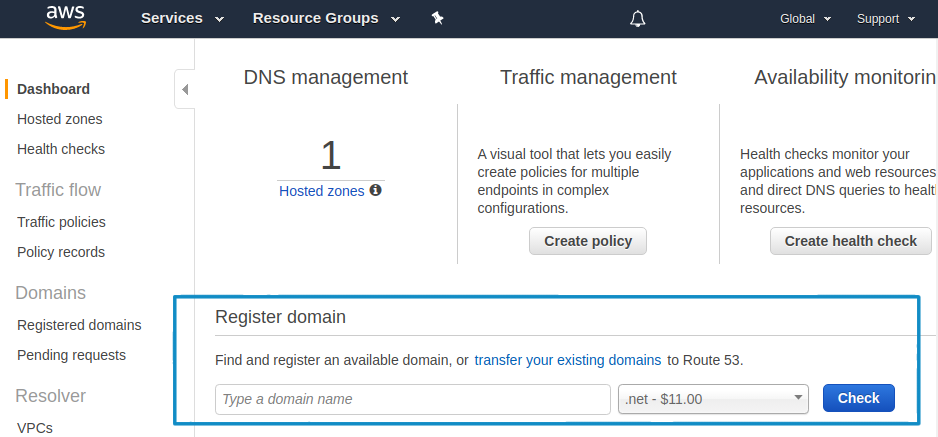
💡 AWS Tip: You can start using a Free Tier. At the time of writing, it’s good for one year.
💡 AWS Tip: After Free Tier expires, you may save up to 75% by using Reserved Instances VS On Demand Instances.
What if domain you’ve chosen is already taken?
Well, there are several ways to deal with that.
- Try to extend you domain with verb, country name, abbreviation, catchphrase or hyphen “-“. E.g. gettocode.com (verb), bootcampusa.com (country name) or allabout.net (catchphrase).
- Use country top level domain names, e.g. .us, .de. .com.uk
- Use alternative top level domain names like .net, and .xyz, e.g calcurator.xyz, but keep in mind that for some people it may not feel save to open URLs with “weird” top level domains.
- Try to buy. This may be costly, so it may be the last option to try.
I found this blog as useful resource to get more info on the subject. Or you can watch the video below that quickly walks through 8 tips on choosing a domain name.
Let’s create a virtual machine
Since we have a domain registered, we can create a virtual machine and route all requests to it. On Amazon AWS, the service for virtual machines is EC2. On Azure, it’s one of the Linux flavors. Because we decided to go as inexpensive as we can, we are limited to a VM selection from the free tier. So go ahead and create a Linux VM.
All shell script examples below assume you have Ubuntu. If you chose different Linux distribution the commands may slightly vary.
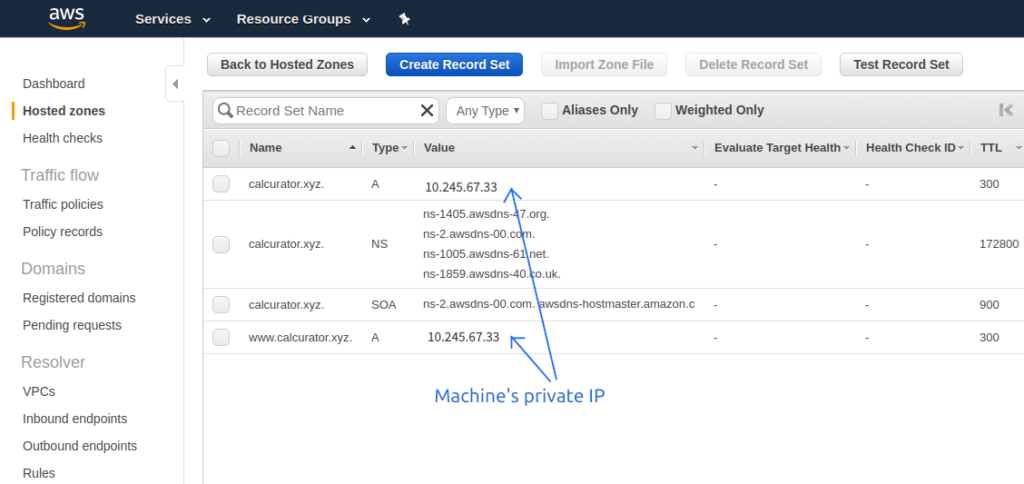
Now, as we have a machine, we can route all requests for our domain to the machine. On AWS, you need to open the Route 53 service and configure your domain record sets to go to your machine’s private IP address. Below is an example of what needs to be configured.
Install Docker on you Linux machine.
sudo apt-get install docker
We will also need docker-compose later on, but nowadays it gets installed with Docker. To double-check whether you have docker-compose installed, run the command below.
docker-compose -v
Now we have a machine, and all requests to our domain get routed to the machine! It is time to get an TLS certificate! With Let Encrypt, we are going to use Certbot to obtain and update the certificate. In general, we are going to follow Certbot instructions with one exception: we are going to do it from inside a Docker container.
Let’s Encrypt Setup
# Run docker container which we are going to use to obtain TLS certificate.
# We map necessary ports and volumes for certbot to obtain the certificate.
sudo docker run --rm -it -p 80:80 -p 443:443 -v /etc/letsencrypt:/etc/letsencrypt debian:stretch-slim
Inside the container, we need to install Certbot.
apt-get update \
&& echo 'deb http://ftp.debian.org/debian stretch-backports main' >> /etc/apt/sources.list \
&& apt-get update \
&& apt-get install -y certbot -t stretch-backports
And now we are ready to get our certificate! After running the command below we will have /etc/letsencrypt folder with all necessary files.
sudo certbot certonly --standalon
Summary
We’ve achieved a lot so far and built a solid base for next steps. We figured out a blog name, registered a domain, spun up a virtual machine, installed Docker, and obtained our TLS certificate.
Next post will describe each Docker container configuration, which will help to set up the entire infrastructure so we have our blog up and running.


One thought on “How to own a blog for FREE – Part 1”