
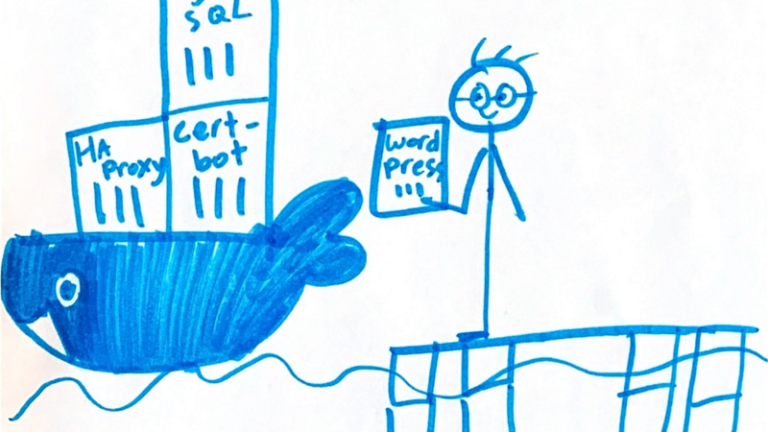
This part will go deep into implementation details, build Docker containers, and deploy a WordPress blog to a Linux virtual machine. To continue further, we need all outcomes of Part 1, among which are a registered domain, a virtual machine with installed Docker and Docker-Compose, and a Let’s Encrypt TLS certificate. If you don’t have all of the above, you can still work through the containers; however, you will not be able to finish the deployment to a cloud.
Here is quick reminder of the goals we set before.
- Be as independent as possible from a cloud provider’s infrastructure.
- Our blog should be portable and easy to set up in a new environment.
- A blog should require as minimum maintenance as possible.
- Security must not be compromised.
- Blog should be inexpensive to run without compromising any of the above.
Important
You can configure everything yourself by following the instructions below. But if you don’t feel comfortable, then it will be a great help to generate a default template using the lets-haproxy cookiecutter. This will not only speed you up, but also provide additional files for deployment and maintenance.
WordPress and MySQL Docker containers

We are going to start with creating a docker-compose.yaml file, where we define two containers for WordPress and a MySQL database that it needs. To let containers discover each other and communicate, we create a network called wp-net. We also define volumes for the MySQL database and for WordPress. Volumes will simplify the backup and restore process for the blog’s data. So here is what we have.
services:

  wordpress:
    image: wordpress:5.3.2-php7.2-apache
    restart: always
    ports:
      - 80
    networks:
      - wp-net
    environment:
      WORDPRESS_DB_HOST: db
      WORDPRESS_DB_NAME: "${WORDPRESS_DB_NAME}"
      WORDPRESS_DB_USER: "${WORDPRESS_DB_USER}"
      WORDPRESS_DB_PASSWORD: "${WORDPRESS_DB_PASSWORD}"
    volumes:
      - wordpress:/var/www/html
    depends_on:
      - db

  db:
    image: mysql:5.7
    restart: always
    environment:
      MYSQL_DATABASE: "${WORDPRESS_DB_NAME}"
      MYSQL_USER: "${WORDPRESS_DB_USER}"
      MYSQL_PASSWORD: "${WORDPRESS_DB_PASSWORD}"
      MYSQL_RANDOM_ROOT_PASSWORD: "0"
      MYSQL_ROOT_PASSWORD: "${MYSQL_ROOT_PASSWORD}"
    networks:
      - wp-net
    volumes:
      - db:/var/lib/mysql

networks:
  wp-net:
    driver: bridge

volumes:
  wordpress:
  db:
Notice that instead of pasting database credentials directly into docker-compose.yaml, we fetch it from environment variables. This ensures that we don’t accidentally commit secrets into a public repository and allows us to keep secrets in a central place. How are we going to store secrets? We are going to use .env files. Docker-compose understands the file format and can read environment variables from it. If we place .env files next to docker-compose.yaml, then environment variables will be read automatically by Docker-compose. Here is an example of .env files for our blog.
WORDPRESS_DB_NAME=super_cool_blog_db
WORDPRESS_DB_USER=WP_db_user
WORDPRESS_DB_PASSWORD=VerySt0ngP@ssword
MYSQL_ROOT_PASSWORD=sUper_sEcreT
HAProxy Docker container
HAProxy plays a big role in our design. It serves two main purposes.
- HAProxy will serve as a TSL terminator. The main purpose of HAProxy in our design is to enforce SSL for our blog. This will allow browsers to trust the blog’s website, and as a bonus, all traffic will be encrypted.
- HAProxy will also help with Let’s Encrypt auto-renew. It will redirect ACME challenge traffic to a Certbot Docker container so we have our certificate auto-renew working.
Prepare certificate
Unfortunate thing is that HAProxy does not understand Let’s Encrypt certificates as they are, so we will need to do a little bit of work. In /etc/letsencrypt/YOUR_DOMAIN/live/NUMBER/ Let’s Encrypt folder we have two files:
- fullchain.pem
- privkey.pem
For HAProxy, we need to combine these 2 files.
cd /etc/letsencrypt/YOUR_DOMAIN/live/NUMBER/
cat fullchain.pem privkey.pem > ~/ YOUR_DOMAIN.pem
YOUR_DOMAIN.pem is a certificate file that HAProxy understands.
Configure HAProxy
The configuration may seem overwhelming, but no worries, we are going to walk through it and explain what we do.
- On top of the file we configure logging, max connections and other things.
- Next, we are configuring SSL parameters.
- Then we tell HAProxy to use Docker resolver so it can resolve containers’ IP addresses by name. That is a big advantage for us. Containers’ IP addresses can be different every time we start them, and it is very difficult to redirect based on something that changes every time. Containers’ names, on the other hand, stay the same, so it’s very convenient to use them in the configuration.
- Next, we have some defaults and then two frontend www-http sections. One is for port 80. It will redirect all HTTP traffic to HTTPS. The other is for port 443. This frontend will redirect all HTTPS traffic to our blog backend, except for the ACME challenge, which will be redirected to the Certbot backend.
- Next we have
backend wordpress-backend. This is our blog backend configuration. - And we have
backend letsencrypt-backend, which is the backend for Certbot to handle ACME challenge traffic.
That is pretty much all for HAProxy configuration. Not as difficult as it might seem.
global
    log 127.0.0.1 local0 debug
    log 127.0.0.1 local1 notice

    pidfile /var/run/haproxy.pid
    stats socket /var/run/haproxy.sock mode 777

    maxconn 2048
    tune.ssl.default-dh-param 2048

    # Default SSL material locations
    ca-base /etc/ssl/certs
    crt-base /etc/ssl/private

    # Default ciphers to use on SSL-enabled listening sockets.
    # For more information, see ciphers(1SSL). This list is from:
    #  https://hynek.me/articles/hardening-your-web-servers-ssl-ciphers/
    ssl-default-bind-ciphers ECDH+AESGCM:DH+AESGCM:ECDH+AES256:DH+AES256:ECDH+AES128:DH+AES:ECDH+3DES:DH+3DES:RSA+AESGCM:RSA+AES:RSA+3DES:!aNULL:!MD5:!DSS
    ssl-default-bind-options no-sslv3

# In Docker 1.10 the Embedded DNS Server was added.
# Containers can use it to discover each other.
# Below are default Docker DNS IP and Port.
# Use Docker Embedded DNS Server to resolve server names
resolvers docker
    nameserver dns 127.0.0.11:53

defaults
    log global
    mode    http
    option  httplog
    option  dontlognull
        timeout connect 5000
        timeout client  50000
        timeout server  50000
    option forwardfor
    option http-server-close

frontend www-http
    bind *:80
    reqadd X-Forwarded-Proto:\ http
    default_backend wordpress-backend

frontend www-https
    bind *:443 ssl crt /etc/haproxy/certs/YOUR_DOMAIN.pem
    reqadd X-Forwarded-Proto:\ https
    acl letsencrypt-acl path_beg /.well-known/acme-challenge/
    use_backend letsencrypt-backend if letsencrypt-acl
    default_backend wordpress-backend

backend wordpress-backend
    # Redirect all traffic to https
    redirect scheme https if !{ ssl_fc }
    # See  https://stackoverflow.com/questions/13227544/haproxy-redirecting-http-to-https-ssl
    # Permanent redirect to https
    # redirect scheme https code 301 if !{ ssl_fc }
    server www-app wordpress:80 check resolvers docker resolve-prefer ipv4
    # Other instances if needed. docker resolver should cover scale,
    # so no more instances are needed
    #server www-2 www_2_private_IP:80 check

backend letsencrypt-backend
    server letsencrypt wp-certbot:54321
HAProxy Docker file
To prepare HAProxy Docker container, we set up logging using rsyslog and copy the rsyslog configuration file rsyslog.conf. Then we copy the entry-point shell script docker-entrypoint.sh and the HAProxy configuration file haproxy.cfg from the previous step. Here is how our HAProxy Dockerfile looks:
FROM haproxy:1.8

RUN apt-get update \
    # Install rsyslog so that HAProxy logs can be directed to a file or standard output
    && apt-get install -y rsyslog \
    && mkdir -p /etc/rsyslog.d \
    && touch /var/log/haproxy.log \
    # here's the catch: by creating a soft-link that
    # links /var/log/haproxy.log to /dev/stdout whatever
    # rsyslogd writes to the file will endup being
    # propagated to the standard output of the container
    && ln -sf /dev/stdout /var/log/haproxy.log

# Copy rsyslog configuration
COPY ./rsyslog.conf /etc/rsyslog.d/

# Override entrypoint
COPY ./docker-entrypoint.sh /
RUN chmod +x /docker-entrypoint.sh

# Copy HAProxy config file
COPY ./haproxy.cfg /usr/local/etc/haproxy/haproxy.cfg

ENTRYPOINT ["/docker-entrypoint.sh"]

CMD ["-f", "/usr/local/etc/haproxy/haproxy.cfg"]
In HAProxy docker-entrypoint.sh, we start rsyslog and then start HAProxy in non-background mode. In addition, we pass a flag to restart HAProxy by the SIGUSR2 signal. We are going to use SIGUSR2 to gracefully bounce HAProxy after renewing our certification with Certbot.
#!/bin/sh

# About set options https://www.tldp.org/LDP/abs/html/options.html
set -o errexit
set -o nounset

readonly RSYSLOG_PID="/var/run/rsyslogd.pid"

main() {
  start_rsyslogd
  start_lb "$@"
}

start_rsyslogd() {
  rm -f $RSYSLOG_PID
  rsyslogd
}

start_lb() {
  # Add a couple useful flags
  # -W  -- "master-worker mode" (similar to the old "haproxy-systemd-wrapper"; allows for reload via "SIGUSR2")
  # -db -- disables background mode
  exec haproxy -W -db "$@"
}

main "$@"
rsyslog.conf looks like this. This file is the last piece of the puzzle to build HAProxy Docker container.
# Loads the imudp into rsyslog address space
# and activates it.
# IMUDP provides the ability to receive syslog
# messages via UDP.
$ModLoad imudp

# Address to listen for syslog messages to be
# received.
$UDPServerAddress 0.0.0.0

# Port to listen for the messages
$UDPServerRun 514

# Take the messages of any priority sent to the
# local0 facility (which we reference in the haproxy
# configuration) and send to the haproxy.log
# file.
local0.* -/var/log/haproxy.log

# Discard the rest
& ~
Certbot Docker container

Certbot container will have two things. One is Certbot itself. And two is cron (time-based job scheduler) which will be starting Let’s Encrypt certificate check once a day by running Certbot . So let’s get started!
Certbot Docker file
First thing, we install cron and Certbot itself. Then, we copy several files which cron and Certbot need. More details about each copied file are below. For now, here is the Certbot Dockerfile.
FROM debian:stretch-slim

RUN apt-get update \
    # Install cron
    && apt-get install -y cron \
    # Install bc tool. Needed to check dates
    && apt-get install -y bc \
    # Install certbot to
    && echo 'deb http://ftp.debian.org/debian stretch-backports main' >> /etc/apt/sources.list \
    && apt-get update \
    && apt-get install -y certbot -t stretch-backports

## To DEBUG cron install rsyslog.
## While attached to the running container start rsyslog
## > service rsyslog restart
## and look for cron logs at file /var/log/system
# RUN apt-get update && apt-get install -y rsyslog

# Copy letsencrypt files and give execution permission
COPY le-renew-haproxy.sh /usr/local/etc/le-renew-haproxy.sh
RUN chmod +x /usr/local/etc/le-renew-haproxy.sh

# Add crontab file in the cron directory
COPY le-renew-cron /etc/cron.d/le-renew-cron

# Cron files must be 644, non writable
# See https://github.com/dokku/dokku-postgres/issues/93
RUN chmod 644 /etc/cron.d/le-renew-cron

# Copy entrypoint and gove execute permissions
COPY ./docker-entrypoint.sh /
RUN chmod +x /docker-entrypoint.sh

ENTRYPOINT ["/docker-entrypoint.sh"]

CMD ["tail", "-f", "/var/log/wp-certbot-cron.log"]
le-renew-haproxy.sh file
This file carries all the weight of certificate renewal process. First, it checks whether certificate is near expiration date, and if so it runs Certbot to obtain fresh certificate from Let’s Encrypt. After Certbot updates the certificate, it combines fullchain.pem and privkey.pem in the format understandable by HAProxy.
Here is le-renew-haproxy.sh file. You may want to replace YOUR_DOMAIN and YOUR_EMAIL with your own.
#!/bin/bash

set -e

domain=YOUR_DOMAIN # E.g. programhappy.net
http_01_port='54321'
letsencrypt_certificates="/etc/letsencrypt"
haproxy_cert_dir="/etc/haproxy/certs"
log_dir="/var/log"
exp_limit=30;

function get_cert_file() {
    local latest_certificate_folder=$(ls ${letsencrypt_certificates}/live/ | grep "^${domain}" | tail -1)
    local fullchain_pem=${letsencrypt_certificates}/live/${latest_certificate_folder}/fullchain.pem
    if [[ $domain != "" ]];
    then
        echo ${fullchain_pem}
    else
        echo "[ERROR] No Argument is passed to get_cert_file"
        exit 1
    fi
}

function get_key_file() {
    local latest_certificate_folder=$(ls ${letsencrypt_certificates}/live/ | grep "^${domain}" | tail -1)
    local privkey_pem=${letsencrypt_certificates}/live/${latest_certificate_folder}/privkey.pem
    if [[ $domain != "" ]];
    then
        echo "${privkey_pem}"
    else
        echo "[ERROR] No Argument is passed to get_key_file"
        exit 1
    fi
}

cert_file=$(get_cert_file ${domain})
if [ ! -f $cert_file ]; then
    echo "[ERROR] certificate file not found for domain ${domain}."
    exit 1;
fi

exp=$(date -d "`openssl x509 -in $cert_file -text -noout|grep "Not After"|cut -c 25-`" +%s)
datenow=$(date -d "now" +%s)
days_exp=$(echo \( $exp - $datenow \) / 86400 |bc)

echo "Checking expiration date for ${domain}..."

if [ "$days_exp" -gt "$exp_limit" ] ; then
    echo "The certificate is up to date, no need for renewal ($days_exp days left)."
    exit 0;
else
    echo "The certificate for $domain is about to expire soon. Starting Let's Encrypt (HAProxy:$http_01_port) renewal script..."
    certbot certonly \
        --standalone \
        --non-interactive \
        --agree-tos \
        --preferred-challenge http-01 \
        --http-01-port $http_01_port \
        --domains ${domain},www.${domain} \
        --email YOUR_EMAIL@gmail.com \
        --logs-dir "${log_dir}/certbot"

    if [ $? -ne 0 ]; then
        echo "[ERROR] Certbot failed.HAProxy certificate is not updated."
        exit 2;
    fi

    # Create a folder if does not exist
    mkdir -p ${haproxy_cert_dir}
    # Allow to write
    chmod -R go+rwx ${haproxy_cert_dir}
    # For HAProxy you must combine fullchain.pem and privkey.pem into a single file.


    fullchain_pem=$(get_cert_file)
    privkey_pem=$(get_key_file)
    if [[ -f "${fullchain_pem}" && -f "${privkey_pem}" ]] ;  then
        echo "Combining certificate for ${d} domain from ${fullchain_pem} and ${privkey_pem}"
        cat ${fullchain_pem} ${privkey_pem} > ${haproxy_cert_dir}/${d}.pem
    else
        echo "[ERROR] Unable to find ${fullchain_pem} or ${privkey_pem} or both of them"
    fi

    # Protect by allowing only to read
    chmod -R go-rwx ${haproxy_cert_dir}

    echo "Renewal process finished for domain $domain"
    exit 0;
fi
le-renew-cron file
le-renew-cron is rather simple. Just don’t forget 2 blank lines at the end of the file, because cron will not work otherwise.
SHELL=/bin/bash

# Every day at 1:30 AM
30 1 * * * root /usr/local/etc/le-renew-haproxy.sh &>> /var/log/wp-certbot-cron.log
# An empty line is required at the end of this file for a valid cron file.
# !!! KEEP TWO EMPTY LINES BELOW, cron will not work otherwise !!!
docker-entrypoint.sh file
Entrypoint to Certbot is doing only one thing. It just prepares and starts the cron job scheduler. Listing has comments which explain every step in detail.
#!/bin/bash

# About set options https://www.tldp.org/LDP/abs/html/options.html
set -e

main() {
    # cron has a security policy to not work if there are lots of hard-links to its files.
    # Unfortunately Docker's layered file-system makes files have lots of hard-links.
    # Command below should fix a lot of hardlinks created.
    # For details see:
    # https://unix.stackexchange.com/questions/453006/getting-cron-to-work-on-docker
    touch /etc/crontab /etc/cron.*/*

    # Create log directory and a file to be able to run tail
    mkdir -p /var/log
    touch /var/log/wp-certbot-cron.log

    # Start cron and reload configs
    service cron restart
    service cron reload

    exec "$@"
}

main "$@"
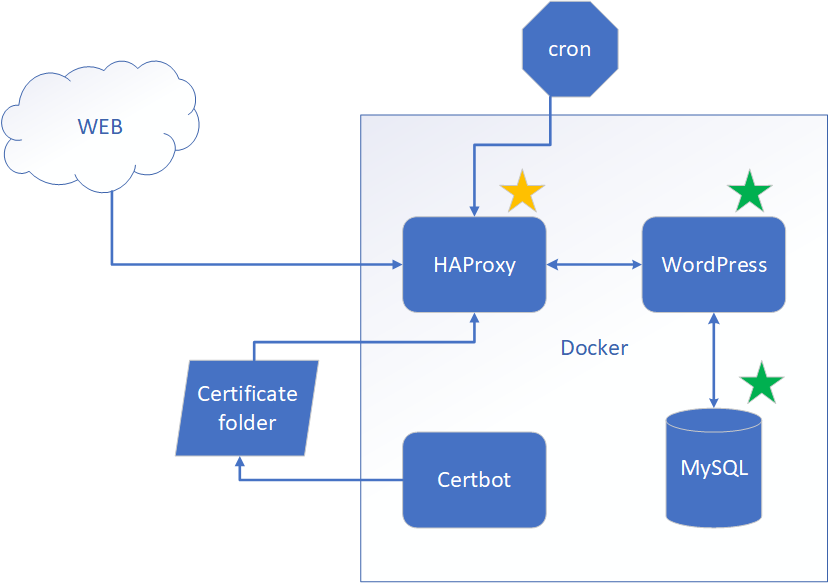
Cron on a host Virtual Machine

We’ve prepared all our Docker containers. We have WordPress and MySQL configured. We have HAProxy for SSL termination and re-routing ACME challenge traffic to Certbot. We have Certbot itself. But we are missing one important piece of the puzzle, though.
How do we tell HAProxy to load a fresh certificate after it’s been renewed? There may be some sophisticated ways to implement that, but we are opting for the simplest solution. If you know a simpler or better way, please let me know. We are going to restart HAProxy once a day, so when we get a fresh certificate, it will be automatically picked up by HAProxy. For that purpose, we are going to have a cron job scheduler on a host virtual machine. To accomplish that, we need two files.
wp-haproxy-restart-cronwp-haproxy-restart
wp-haproxy-restart-cron
Below is a cron file which will run wp-haproxy-restart.sh every day at 2 AM.
SHELL=/bin/bash

# Every day at 2:00 AM
0 2 * * * root /usr/local/etc/programhappy/wp-haproxy-restart.sh &>> /tmp/logs/cron/wp-haproxy-restart-cron.log
# An empty line is required at the end of this file for a valid cron file.
# !!! KEEP TWO EMPTY LINES BELOW, cron will not work otherwise !!!
wp-haproxy-restart
We have only one instance of HAProxy running; therefore, we will have downtime while it’s been restarted. Because we have a blog, not a real-time trading application, very short, infrequent downtimes are acceptable. To minimize the impact of downtime, we can do two things.
- Gracefully bounce HAProxy so that it will stop receiving new requests, finish serving current requests, and restart. This can be achieved by sending the
SIGHUPsignal to the HAProxy container. - Schedule restart during non peak hours. For example 2 AM.
Total duration of downtime can be estimated somewhere under a second. The script below is run by cron and will accomplish exactly what we discussed above.
# !!! KEEP THESE EMPTY LINES, cron will not work otherwis# !!! KEEP THESE EMPTY LINES, cron will not work otherwis#!/bin/bash

set -e

docker_compose="sudo docker-compose"

# cd to the directory so that docker-compose.yaml can be found
cd /usr/local/etc/YOUR_DOMAIN

## Send SIGHUP to gracefully reload haproxy.
## This may cause only minimum connections lost during peak hours.
# See https://hub.docker.com/_/haproxy/ for details
${docker_compose} kill -s SIGHUP wp-haproxy

# Print all rinning containers
${docker_compose} ps
Common folders on a host Virtual Machine
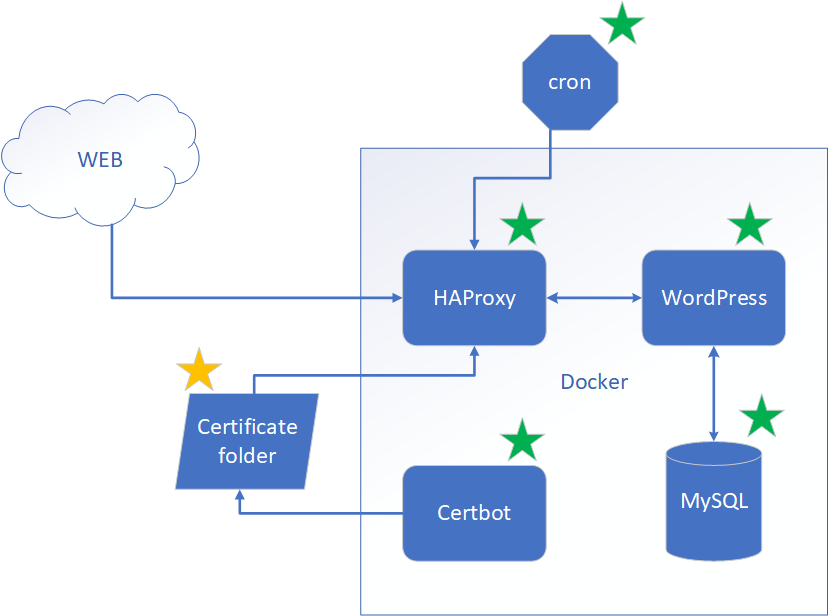
Final piece of the puzzle is Certificate folders. There are two which are mounded as volumes to multiple of our Docker containers to share certificates.
-
/etc/letsencryptis where Let’s Encrypt will store certificates. -
/etc/haproxy/certsis where we will maintain certificate file which HAProxy understands. The file is derived from Let’s Encrypt certificate files the way we described above.
There is one more additional folder which is also important. It is /tmp/logs where all containers will be dumping their logs. We did it for convenience so we have a single place where we can see all the logs.
Deployment
Having so many pieces, how do we manage deployment? The answer is automation! If you decided to use lets-haproxy cookiecutter to generate code from the templates, you will have a deploy.sh file which will copy all the necessary bits where they need to be and start all containers. If not, you can follow the steps below and do it all manually. You can also keep reading to understand the generate code in more detail.
Steps to Deploy
Combine fullchain.pem and privkey.pem into a single file YOUR_DOMAIN.pem and place it into /etc/haproxy/certs folder. Protect /etc/haproxy/certs by running command below.
chmod -R go-rwx /etc/haproxy/certs
Build Docker images for HAProxy and Certbot using the script below.
#!/bin/bash

function build_image() {
    local image_name=$1
    local image_tag=$2
    local image_name_full_name=${image_name}:${image_tag}

    echo "Building Docker image ${image_name_full_name}"
    sudo docker build -t $image_name_full_name .
}

build_image wp-certbot 1.0.0
build_image wp-haproxy 1.0.0
If you deployed earlier and have docker-compose running, you will need to stop it before continuing. The command below assumes that you copied docker-compose.yaml into /usr/local/etc/{YOUR_DOMAIN}/docker-compose.yaml folder when deploying.
sudo docker-compose -f /usr/local/etc/{YOUR_DOMAIN}/docker-compose.yaml down
Remove old files if you’ve deployed before.
#!/bin/bash
rm -fv /etc/cron.d/wp-haproxy-restart-cron
rm -rfv /usr/local/etc/{YOUR_DOMAIN}
To restart HAProxy periodically, copy new deployment files including wp-haproxy-restart.sh and wp-haproxy-restart-cron. Also copy docker-compose.yaml to prevent accidental changes.
#!/bin/bash

mkdir -p /usr/local/etc/{YOUR_DOMAIN}

# Docker Compose
cp docker-compose.yaml /usr/local/etc/{YOUR_DOMAIN}/docker-compose.yaml
# Environment variables file with secrets for MySQL and WordPress
cp .env /usr/local/etc/{YOUR_DOMAIN}/.env

# Cron

## HAProxy restart script
cp wp-haproxy-restart-cron/wp-haproxy-restart.sh /usr/local/etc/{YOUR_DOMAIN}/wp-haproxy-restart.sh
chmod +x /usr/local/etc/{YOUR_DOMAIN}/wp-haproxy-restart.sh

## Create directpry for cron logs if not exist
mkdir -p /tmp/logs/cron

## Cron File
cp wp-haproxy-restart-cron/wp-haproxy-restart-cron /etc/cron.d/wp-haproxy-restart-cron
### Cron files must be 644, non writable
### See https://github.com/dokku/dokku-postgres/issues/93
chmod 644 /etc/cron.d/wp-haproxy-restart-cron
Now it’s time to start all containers in the background. Now open a browser and hit YOR_DOMAIN. I hope you are smiling now 🙂
sudo docker-compose -f /usr/local/etc/{YOUR_DOMAIN}/docker-compose.yaml up -d
Maintenance
The setup we have needs very little maintenance. We have everything automated, except for backups. Remember, we have two Docker volumes. One is for the MySQL database, the other is for the WordPress files. We need to back them up once in a while just in case we lose the VM and can’t restore from the image. The script below shows how to back up the volumes into .tar files and put them into the ~/backup folder. The script will stop all Docker containers before doing the backup and after it’s done, it will start docker-compose. Don’t forget to copy the backup files to a safe place.
#!/bin/bash

set -e

DOCKER="sudo docker"
DOCKER_COMPOSE="sudo docker-compose"
DOCKER_COMPOSE_FILE="/usr/local/etc/{YOUR_DOMAIN}/docker-compose.yaml"

# Stop containers
${DOCKER_COMPOSE} -f ${DOCKER_COMPOSE_FILE} down

mkdir -p ~/backup

# WordPress
$DOCKER run --rm --mount source=wordpressblog_wordpress,target=/var/www/html -v ~/backup:/backup debian:stretch-slim bash -c "cd /var/www/html && tar cvf /backup/wordpressblog_wordpress.tar ."
#MySQL
$DOCKER run --rm --mount source=wordpressblog_db,target=/var/lib/mysql -v ~/backup:/backup debian:stretch-slim bash -c "cd /var/lib/mysql && tar cvf /backup/wordpressblog_db.tar ."

# Start containers
${DOCKER_COMPOSE} -f ${DOCKER_COMPOSE_FILE} up -d
More details on how to backup and restore the blog here.
Summary
This post walked us through all steps necessary to create a highly portable and cloud-provider-independent configuration. If it’s your first year on a cloud, you may take advantage of “one year free” offers and have your own blog for the entire year almost for free. We did not use any cloud provider’s specific services, so should we have a need, we can migrate to another cloud provider.
If you’d like to bootstrap the entire fast, try to generate templates using lets-haproxy cookiecutter. The generated code will require only a few changes, which include adding and configuring WordPress and MySQL Docker containers.
Hope you find this tutorial helpful, and I wish you good luck on your journey to blogging!


One thought on “How to own a blog for FREE – Part 2”