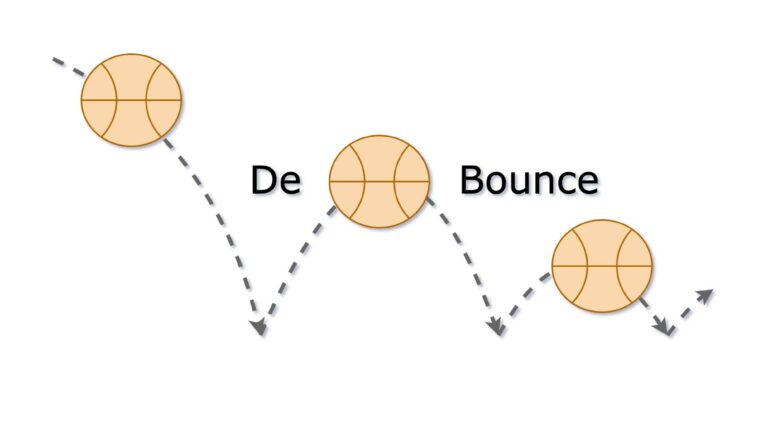
What is De-Bouncer? De-Bouncer is a strategy to avoid excessive load on backend while maintaining User Interface responsiveness. The best way to explain how it works is to walk through a simple example.
The Example
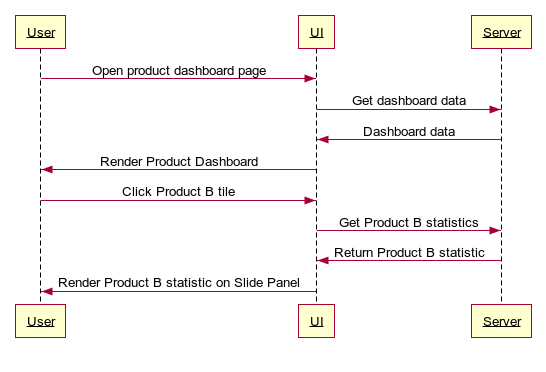
Let’s look at a simple web application that shows a gallery of products to a user. Upon clicking on a product, the application shows a slide-out panel with a product information, including price fluctuations over time, customer orders statics, aggregation of user’s feedback and other useful data to help marketing team promote the product.
This is how the dashboard application UI may look like.

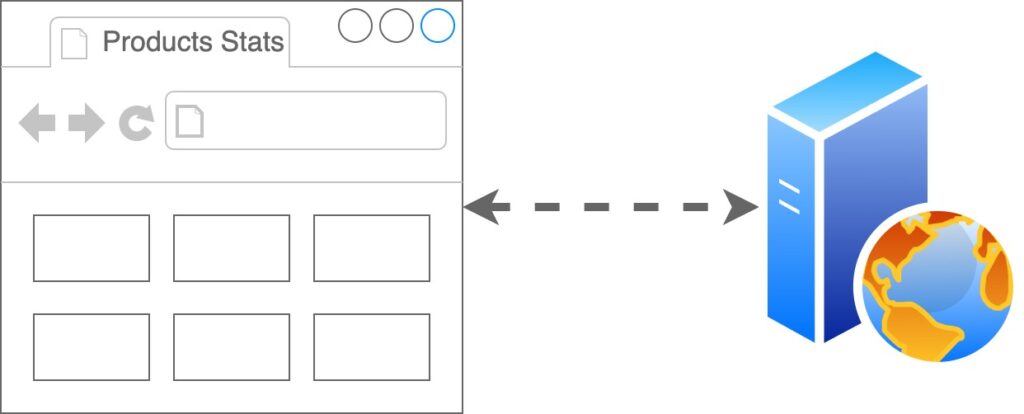
We will keep application architecture as simple as possible. The dashboard UI will be communicating with a single server as shown below.
As requirement, the products dashboard must be loaded as fast as possible, it may contain thousands of products, therefore loading all details for each product upon dashboard initial load is not feasible. We will have to delay loading of full product details until user clicks on a product tile in the dashboard.
Problem Definition
When the dashboard is loaded, user may start clicking on the product tiles frequently; every click will initiate a call to the service, resulting in a flood of requests. However, the app just needs to load the last clicked product statistics to display. The requests UI sent for previously clicked items are no longer needed, however they will be processed by the server and returned to the app consuming server resources and network bandwidth.
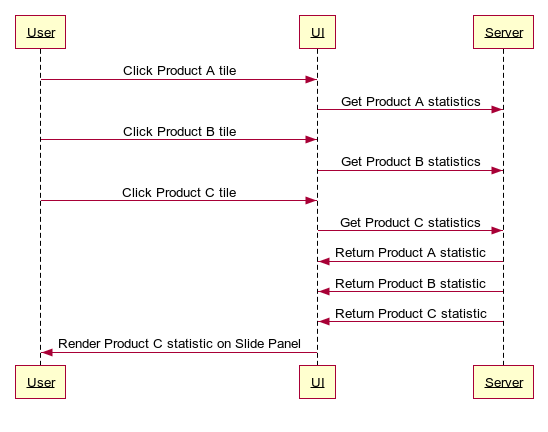
The above creates a flood of requests and is a serious problem, so how do we solve it?
Naïve De-Bouncer Solution
The simplest option is to disable click event handler when user initiates an action, then send a request, wait for the response or timeout, render the response or error and then enable event handler again. While event handler is disabled, there must be an indication to a user that clicks are no longer available.
To indicate clicks unavailability, we can either block UI with loading dialog or gray-out product tiles.
export async function onProductTileClick(eventArgs) {
    showLoading();
    const product = await fetchProduct(eventArgs.productId);
    hideLoading();
    showSlideOutProductPanel(product);
}
The solution is quite basic; indeed, it fixes requests flood problem, however it makes the application appear unresponsive and slow. User has to wait for product statistics to be loaded every time after clicking a product tile. Even if user clicks on a wrong tile, they will have to wait for a product statistic to be loaded before they can click the right tile.
So how do we make the app appear more responsive?
Maximize responsiveness, De-Bouncer step by step
To maximize responsiveness, we should avoid blocking click event handler and start loading statistics immediately. Unfortunately, it opens two problems:
- How to ensure only the last clicked product statistic is loaded and all server responses initiated from previously clicked tiles are ignored. Note, that the order of responses we receive is not guaranteed to be the same as the order of requests we made.
- How to avoid sending request for each product tile click, even though we need statistic data only for the last clicked tile.
To help us address the first problem and still keep the application appear responsive we are going to use Cancellation Token idea.
Cancellation Token
Cancellation token is a great concept that we can borrow from C# Task Parallel library.
export class CancellationToken {
    #isCancelled: boolean;

    public get isCancelled() { return this.#isCancelled };

    public cancel(): void {
        this.#isCancelled = true;
    }
}
The main purpose of CancellationToken is to track whether it was cancelled and to ensure it cannot be un-cancelled. We can introduce CancellationToken to our event handler as shown below.
let productFetchCancellationToken = new CancellationToken();

export async function onProductTileClick(eventArgs) {
    // Cancel previously created token.
    productFetchCancellationToken.cancel();

    // Create and keep current token.
    const currentToken = new CancellationToken();
    productFetchCancellationToken = currentToken;

    const product = await fetchProduct(eventArgs.productId);

    // If current token was cancelled by next Product Tile click, then
    // just exit.
    if (currentToken.isCancelled) {
        return;
    }

    // Fetch was not cancelled, so we can show Product in
    // the slide out panel.
    showSlideOutProductPanel(product);
}
Every request we make is associated with new Cancellation Token. Before making new request, we cancel previous Cancellation Token and create new Cancellation Token for new request. Upon receiving a response, we check if the cancellation token associated with the request was cancelled, and if so, we just terminate execution by simply returning from the click event handler.
In other words, when user clicks product tiles multiple times, we cancel all but the last action using Cancellation Token to ensure only response for the last clicked tile is rendered.
With help of Cancellation Token our app remained super responsive and we render only the response associated with the last clicked product tile, however the backend is still flooded with unnecessary requests. It is time to solve this problem as well.
Delay
When user clicks N times, we are still initiating N calls to the service. If user makes clicks slowly, we assume that they read product statistic data rendered in the side panel and requests we made were not wasteful. However, if user makes clicks rapidly, then we will make N-1 wasteful requests because only the last one is now rendered.
To solve rapid click problem, we can use a timer to delay real service call, so that when user clicks frequently N times, we will be resetting the timer N-1 times delaying real service call and making only the last request after the timer expires.
First, we need to create a function that will return a Promise, and then resolve it when timer ticks. You can find code for the function below.
async function delay(delayByMs: number) {
    return new Promise((resolve) => {
        setTimeout(() => {
            resolve(true);
        }, delayByMs);
    });
}
Now let’s rewrite out click event handler with delay function.
export async function onProductTileClick(eventArgs) {
    productFetchCancellationToken.cancel();


    const currentToken = new CancellationToken();
    productFetchCancellationToken = currentToken;

    // Delay real service call by 1 second
    await delayByMs(1000);

    // If new click happened before delay expired, then just exit.
    if (currentToken.isCancelled) {
        return;
    }

    const product = await fetchProduct(eventArgs.productId);

    if (currentToken.isCancelled) {
        return;
    }

    showSlideOutProductPanel(product);
}
Delay-on-click technique solves requests flood problem and keeps our application relatively responsive. We process and react to dashboard item clicks immediately, however, there is still a tiny problem left. We are penalizing good citizens (users that do not click frequently) delaying service requests for every click they make by a constant number of seconds. I believe we can do better!
Penalize Exponentially
To avoid constant penalty, we can introduce a function that will decrease delay with decreased clicks frequency. The higher frequency of clicks the larger is delay. As one option we can use an exponential decay function P = P0 * e-kx . Using any online graph calculators we can fine tune the function parameters, for example https://www.desmos.com/calculator. We settled on P0 = 2 and k = 2.5 empirically so the functions looks like the graph below.

Now let’s implement a function to calculate next delay based on click frequency. We can also limit maximum delay and avoid setting the timer for small delay values.
const maxDelayMs = 3000; // 3 seconds
const minDelayMs = 0;
// We need to remember time of last click to be able
// to calculate frequency.
let latestDebounceTimeMs = new Date().getTime();

function nextDelayMs(): number {
    const nowTimeInMs = new Date().getTime();
    // Frequency is a difference in milliseconds between
    // subsequent clicks.
    const frequency = nowTimeInMs - latestDebounceTimeMs;
    latestDebounceTimeMs = nowTimeInMs;

    // Adjusted to handle milliseconds to seconds conversion.
    const P0 = 2000;
    const k = -0.0025;
    let delayMs = Math.floor(P0 * Math.pow(Math.E, k * frequency));

    // Ensure delayMs is within the boundaries between
    // minDelayMs and maxDelayMs.
    delayMs = Math.min(delayMs, maxDelayMs);
    return Math.max(delayMs, minDelayMs);
}
We can now add delay calculation to our click event handler as shown below. Additionally, we will be ignoring small delay values as it does not make sense to set timer for very short time intervals. We have empirically identified that intervals shorter than 40 milliseconds are not worth delaying.
export async function onProductTileClick(eventArgs) {
    productFetchCancellationToken.cancel();

    const currentToken = new CancellationToken();
    productFetchCancellationToken = currentToken;

    // It does not make sense to delay for very short period of time.
    // We settled on 40 ms empirically.
    const ignoreDelayLessThanMs = 40;
    const delayMs = nextDelayMs();
    if (delayMs > ignoreDelayLessThanMs) {
        await delayByMs(delayMs);
    }

    if (currentToken.isCancelled) {
        return;
    }

    const product = await fetchProduct(eventArgs.productId);

    if (currentToken.isCancelled) {
        return;
    }

    showSlideOutProductPanel(product);
}
Seems like we have solved all problems now and we can be proud delivering the application to users. But… what if we would like to De-Bounce other user actions? Do we just copy the code into other click event handler? Or… can we make it reusable?
All Comes Together
To make our code reusables, let’s move the De-Bounce code from click event handler into a separate module. The module contains DeBouncer class and some helper functions that you have seen above. Our goal is to simplify De-Bounce logic implementation in event handlers; therefore, we encapsulate the helper functions and only expose APIs we need. You should recognize the code below as evolution of all the steps we went over earlier.
export class CancellationToken {
    #isCancelled: boolean;

    public get isCancelled() { return this.#isCancelled };

    public cancel(): void {
        this.#isCancelled = true;
    }
}

export class DeBouncer {
    readonly #maxDelayMs: number;
    readonly #minDelayMs: number;
    readonly #delayNoise: number;
    #latestToken: CancellationToken = new CancellationToken();
    #latestDebounceTimeMs: number;

    constructor(
        maxDelayMs: number = 3000,
        minDelayMs: number = 0,
        delayNoise: number = 40) {
        // Make sure #maxDelayMs is greater than 0;
        this.#maxDelayMs = Math.max(maxDelayMs, 0);
        // Make sure #minDelayMs is greater than 0 and less or equal to #maxDelayMs;
        this.#minDelayMs = Math.min(Math.max(minDelayMs, 0), this.#maxDelayMs);
        // #delayNoise must be less or equal to #maxDelayMs,
        // otherwise all delays will be considered as noise and will be ignored.
        this.#delayNoise = Math.min(delayNoise, this.#maxDelayMs);
    }

    public async debounce(): Promise<CancellationToken> {
        this.#latestToken.cancel();
        const currentToken = new CancellationToken();
        this.#latestToken = currentToken;
        const delayByMs = this.#nextDelayMs();
        if (delayByMs > 0 && delayByMs >= this.#delayNoise) {
            await delay(delayByMs);
        }

        return Promise.resolve(currentToken);
    }

    get #nowTimeInMs(): number {
        return new Date().getTime();
    }

    #nextDelayMs(): number {
        const nowTimeInMs = this.#nowTimeInMs;
        // Frequency is a difference in milliseconds between subsequent actions.
        const frequency = nowTimeInMs - this.#latestDebounceTimeMs;
        this.#latestDebounceTimeMs = nowTimeInMs;
        const P0 = 2;
        const k = -2.5;
        let delayMs = Math.floor(P0 * Math.pow(Math.E, k * frequency));
        delayMs = Math.min(delayMs, this.#maxDelayMs);
        return Math.max(delayMs, this.#minDelayMs);
    }
}

async function delay(delayByMs: number) {
    return new Promise((resolve) => {
        setTimeout(() => {
            resolve(true);
        }, delayByMs);
    });
}
After moving the code and using DeBouncer, the product tile click handler is so much simpler now.
// Create a DeBouncer instance for each user action type
// you would like to  De-Bounce.
const productTileClickDeBouncer = new DeBouncer();

export async function onProductTileClickWithDebBouncer(eventArgs) {
    // Await for DeBouncer to release
    const currentToken = await productTileClickDeBouncer.debounce();

    // Check if action was cancelled before it was released.
    if (currentToken.isCancelled) {
        return;
    }

    const product = await fetchProduct(eventArgs.productId);
    if (currentToken.isCancelled) {
        return;
    }
    showSlideOutProductPanel(product);
}
Now if you would like to De-Bounce other user actions, for example review star clicks and user typing in a search bar, you can create an instance of DeBouncer for each action type like shown below. Event handlers will look quite simple and include 2 steps: await debounce and then check cancellation token.
const reviewStartClickClickDeBouncer = new DeBouncer();
const searchInputKeypressDeBouncer = new DeBouncer();

async function onReviewStartClickClick() {
    const currentToken = await reviewStartClickClickDeBouncer.debounce()
    if (currentToken.isCancelled) {
        return;
    }
    // ... Save review rating.
}

async function onSearchInputKeypress() {
    const currentToken = await searchInputKeypressDeBouncer.debounce();
    if (currentToken.isCancelled) {
        return;
    }
    // ... Submit search request.
}
Thanks for your attention!
I hope you found De-Bouncer strategy useful. If you have any follow up questions or would like to share your feedback, please feel free to drop a comment.
If you would like to use DeBouncer, please consider tying DeBouncer npm package.
npm i @pavelhudau/de-bouncer